REST API TESTING:
Let’s think about this scenario when the user is trying to log in with the application. How does the system know ‘The user is already registered in the system’ or ‘The user account is verified’ and we can navigate the particular user to the feed page, ‘The user account is not verified’ and we have to show an alert message or the user should be navigated to OTP Screen.
‘The user has not completed the profile setup’ and the user should be navigated to the ‘Profile Setup Screen’.
All the navigation and alert messages will be handled based on the API response when the user is log in with the application.
when you are taking any mobile and web applications, it will display 80% to 90% of dynamic data from the server.
There is another possibility of using the local database to develop the application, but the major drawback is it will consume more memory.
It’s very important to test the Web Service API’s to find the defects on the early stage of development and stable the core business logic.
We can do the REST API Testing by using the API SWAGGER, JMeter and POST MAN.
Before doing the API testing, the tester should understand few basic things about HTTP Methods, API Schema, API Response.
In this blog, we will see the below topics,
- What are all the HTTP methods available?
- What is mean by API Swagger?
- How to send the request payload to the server?
- How to form the request?
- How to analyze the API schema with the UI?
- How to verify the API Response with the API Model schema
- How to write the API test cases?
- What are all the environments will be available?
- HTTP methodsUse HTTP methods to map CRUD (create, retrieve, update, delete) operations to HTTP requests.GETRetrieve information. GET requests must be safe and idempotent, meaning regardless of how many times it repeats with the same parameters, the results are the same. They can have side effects, but the user doesn’t expect them, so they cannot be critical to the operation of the system. Requests can also be partial or conditional.
Retrieve an address with an ID of 1:
URL: http://api.test.example.tk:80/userprofile
METHOD: GET
POST
Request that the resource at the URI does something with the provided entity. Often POST is used to create a new entity, but it can also be used to update an entity.
Create a new address:
URL: http://api.test.example.tk:80/registration
METHOD: POST
PUT
Store an entity at a URI. PUT can create a new entity or update an existing one. A PUT request is idempotent. Idempotency is the main difference between the expectations of PUT versus a POST request.
Modify the address with an ID of 1:
URL: http://api.test.example.tk:80/userprofile
METHOD: PUT
Note: PUT replaces an existing entity. If only a subset of data elements is provided, the rest will be replaced with empty or null.
DELETE
Request that a resource is removed; however, the resource does not have to be removed immediately. It could be an asynchronous or long-running request.
URL: http://api.test.example.tk:80/myoders
METHOD: PUT
Status codes indicate the result of the HTTP request.
1XX – informational
2XX – success
3XX – redirection
4XX – client error
5XX – server error
Environments:
Normally there will be 4 environments will be available. The below environment for your reference,
- Test Environment – The testing team will work here. They will do all kind of testing and execute the test cases here.
- Development Environment – The developer will work here. Once they complete the modules and they will update their code in the development environment. The server deployment team will move the code to development environment to testing environment for Testing after the development team confirmation.
- Stage Environment – Let assume that the team is working in the Agile methodology. There are 8 sprints available. The sprint 1 module is completed the client wants to see the progress. Now the team will deploy the build in Stage Environment and the client can see the progress at the same time If the developer/tester can proceed their work and it won’t affect the stage module.
Example: Let assume that there is no staging environment given for the project, All the teams are working in the same environment and the client is testing the build. Now the developer pushed their code after complete the new module or after fixing the bug. Now the client might face some issues in the released build.
- Production/ Live environment: Once the development teams is completed all the
Modules. The testing team closed all the internal issues then the server team will deploy the code in Live/Production. The end user will start using the application, the development or support team will fix the issues which happened in the live/production server.
API SWAGGER:
Swagger (okay, now the “Open API Initiative”… more on that later!) is a framework for describing your API using a common language that everyone can understand. Think of it as a blueprint for a house. You can use whatever building materials you like, but you can’t step outside the parameters of the blueprint.
There are other available frameworks that have gained some popularity, such as RAML, API Blueprint, and Summation. But Swagger provides more benefits than just helping create clear documentation.
- It’s comprehensible for developers and non-developers. Product managers, partners, and even potential clients can have input into the design of your API because they can see it clearly mapped out in this friendly UI.
- It’s human-readable and machine-readable. This means that not only can this be shared with your team internally, but the same documentation can be used to automate API-dependent processes.
- It’s easily adjustable. This makes it great for testing and debugging API problems.
Example :
Let assume that the below requirement is given by the client.
APP Name – FaceLive
- Sign Up – The new user should able to register with the app.
- Login – The user can able to login with the App.
- User Profile Update – The user should able to update their profile image, cover image, name, address and personal information like Gender, Age, DOB etc.
- The user can see the list of feed list.
- The user can send the friend request.
- The user can see the Friend list
The below API’s are released to the testing team and we have to test the API.
The client-side developer will start integrating the applications, once the API testing is completed.
Before we released the API to the client side developer, the UNIT case developer or tester should test all the API’s and make sure that the core API’s scenarios are working fine.
URL: http://api.test.facelive.tk:80
Credentials: Username – admin and Password – admin. (It depends on company to company. The API SWAGGER will look like below,
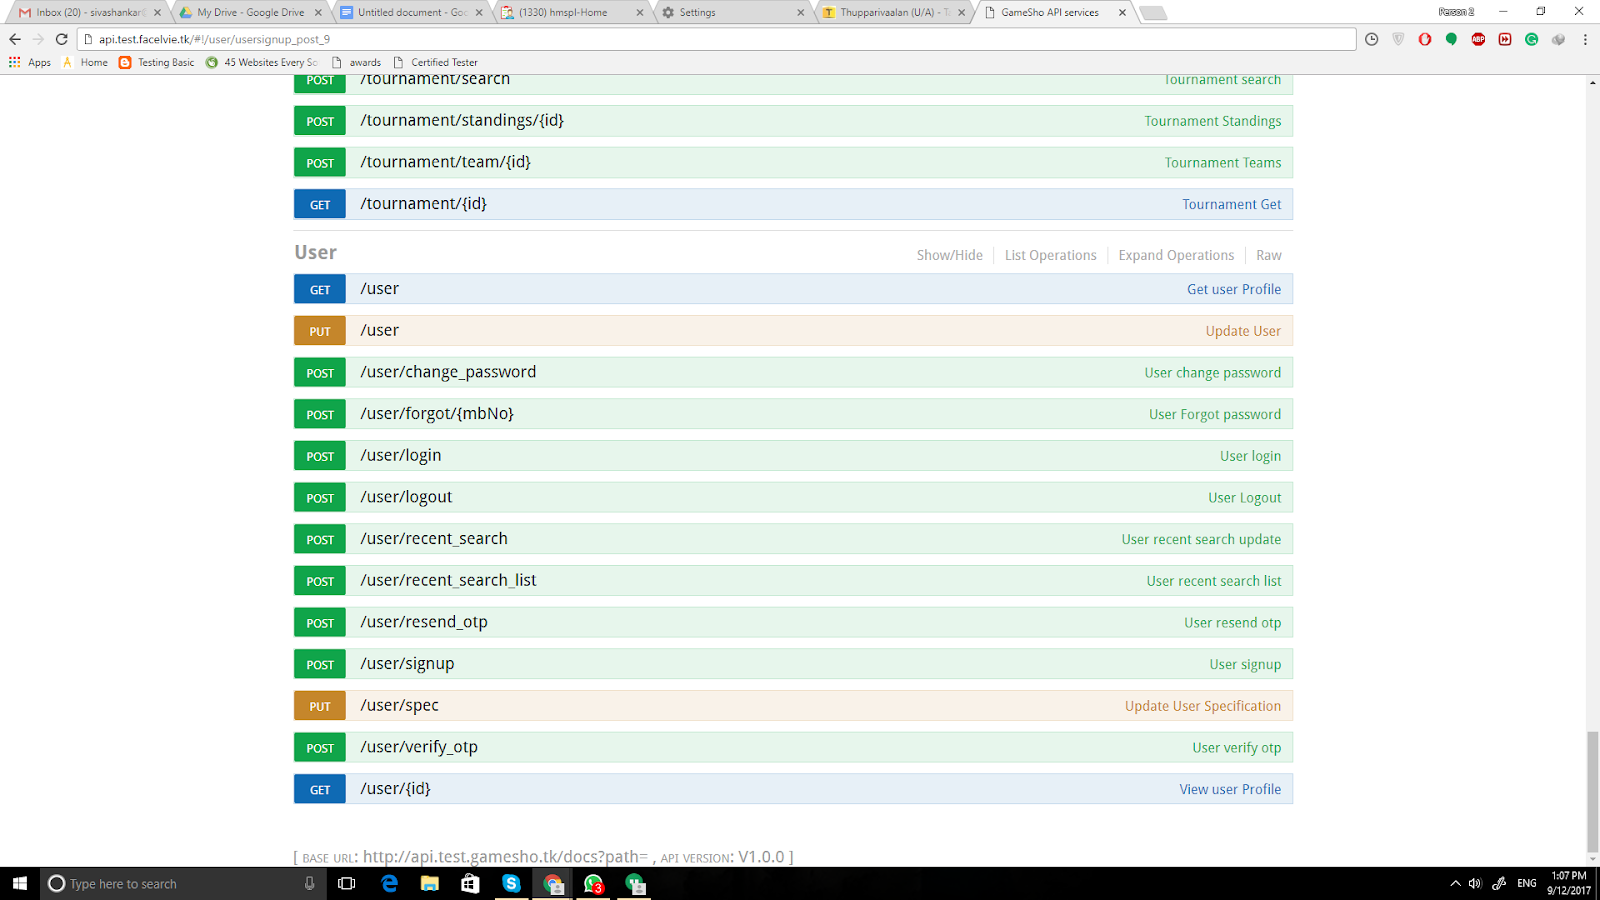
The tester can see the list of API’s like this,
How to analyze the API schema? How to compare the API schema with the UI?
METHOD: POST


API SCHEMA :
{
“cCode”: “”,
“cntNo”: 0,
“pwd”: “”,
“device”: {
“mode”: “”,
“deviceId”: “”,
“deviceToken”: “”,
“model”: “”,
“version”: “”
}
}

API Request will be formed like this,
{
“cCode”: “+91”,
“cntNo”: 9566262694,
“pwd”: “123456”,
“device”: {
“mode”: “ANDROID”,
“deviceId”: “2342342”,
“deviceToken”: “2342342”,
“model”: “Samsung”,
“version”: “23”
}
}
Device info object – Device information will be taken automatically based on the user mobile, device id, device token, model and version.
When we see the API schema, there is no key to mention the Name and it’s an issue. We can report the issue to the server team.
The API scheme suppose to be released like below,
{
“firstName”: “”,
“cCode”: “”,
“cntNo”: 0,
“pwd”: “”,
“device”: {
“mode”: “”,
“deviceId”: “”,
“deviceToken”: “”,
“model”: “”,
“version”: “”
}
}
Then the user can enter the Name, Contact Number and password in the frond end GUI, then the request will be formed like below,
{
“firstName”: “Siva Shankar”,
“cCode”: “+91”,
“cntNo”: 9566262694,
“pwd”: “123456”,
“device”: {
“mode”: “ANDROID”,
“deviceId”: “2342342”,
“deviceToken”: “2342342”,
“model”: “Samsung”,
“version”: “23”
}
}
We can report the issue If the server side developer did not follow the naming convention guidelines as well,
The API schema key should be displayed like below,
firstName, deviceToken, cntNo, cCode, isRequestSent, isFriend.
If they set the key like below, then we can report the issue,
FirstName, DeviceTOKEN, CNTNO, CCode.
How to analyze the API Response:
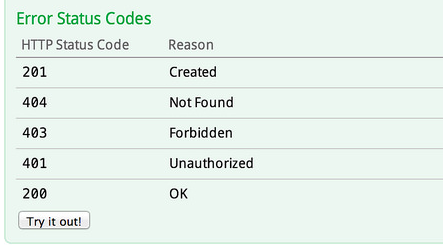
In Swagger, you can see the API response Object.
We can see the default API response object for API like below,

Let assume the below scenarios,
(i) The tester can lock the issue If there is no status code.
(ii) If the entire response schema is not defined.
Based on the requirement API Model Schema should be changed.
API Test Cases :
Test case API Format Example Test Case:
SIGN UP SCREEN REFERENCE:
Sample API Test Case for SIGNUP:
|
GS_SI_API01 |
When the user is not registered with the app and trying to Login. |
|
GS_SI_API02 |
The user is already registered with the app. The user enters the mobile number which is already available in DB. |
|
GS_SI_API03 |
The user did not enter the ‘Password’ and trying to ‘Register’. |
|
GS_SI_API04 |
If the user did not fill any mandatory field like ‘cCode’,’cntNo’,’Mode’, ‘Device iD’, ‘deviceToken’, then the API should throw the alert message |
|
GS_SI_API05 |
The user did not fill the optional filed and trying to register with App. Make sure that the API is not throwing any alert. |
|
GS_SI_API06 |
Check the API response with Response Object. |
CASE ID 1:
When the user is not registered with the app and trying to Login.
URL : api.test.facelive.tk:80/user/signup
METHOD : POST
Request Payload :
{
“firstName”: “Siva Shankar”,
“cCode”: “+91”,
“cntNo”: 9566262694,
“pwd”: “123456”,
“device”: {
“mode”: “ANDROID”,
“deviceId”: “234234”,
“deviceToken”: “234234”,
“model”: “SAMSUN”,
“version”: “2.0”
}
}
API Response:
{
“statusCode”: 200,
“message”: “Success”,
“authorization”: “DeqrkRVMLylPWrUwtlWDkXImN”
}
CASE ID 2: The user is already register with the app. The user enters the mobile number which is already available in DB.
URL : api.test.facelive.tk:80/user/signup
METHOD : POST
{
“firstName”: “Siva Shankar”,
“cCode”: “+91”,
“cntNo”: 9566262694,
“pwd”: “123456”,
“device”: {
“mode”: “ANDROID”,
“deviceId”: “234234”,
“deviceToken”: “234234”,
“model”: “SAMSUN”,
“version”: “2.0”
}
}
API Response should come like below,
{
“statusCode”: 411,
“message”: “Mobile No Already Registered”
}
If the response is coming like below, then we can report the issue.
{
“statusCode”: 200,
“message”: “Success”,
“authorization”: “DeqrkRVMLylPWrUwtlWDkXImN”
}
The user should get the error message If the user is trying to register again.
CASE ID – 3: If the user is trying to register without enter the Password,
URL : api.test.facelive.tk:80/user/signup
METHOD : POST
Request Payload :
{
“firstName”: “Siva Shankar”,
“cCode”: “+91”,
“cntNo”: 9566262694,
“pwd”: “123456”,
“device”: {
“mode”: “ANDROID”,
“deviceId”: “234234”,
“deviceToken”: “234234”,
“model”: “SAMSUN”,
“version”: “2.0”
}
}
Response:
{
“statusCode”: 400,
“error”: “Bad Request”,
“message”: “child \”pwd\” fails because [\”pwd\” is not allowed to be empty]”,
“validation”: {
“source”: “payload”,
“keys”: [
“pwd”
]
}
}
The response should come like ‘Password should not be empty”.
Case ID 4 – If the user did not fill any mandatory field like ‘cCode’,’cntNo’,’Mode’, ‘Device iD’, ‘deviceToken’, then the API should throw the alert message
URL : api.test.facelive.tk:80/user/signup
METHOD : POST
Request Payload:
{
“cntNo”: 9566262693,
“pwd”: “123456”,
“device”: {
“mode”: “ANDROID”,
“model”: “234342342”,
“version”: “234234234”
}
}
API Response:
{
“statusCode”: 400,
“error”: “Bad Request”,
“message”: “child \”cCode\” fails because [\”cCode\” is required]”,
“validation”: {
“source”: “payload”,
“keys”: [
“cCode”
]
}
}
Case ID 5: Check the API response with Response Object.
URL : api.test.facelive.tk:80/user/signup
METHOD : POST
Request Payload :
{
“firstName”: “Siva Shankar”,
“cCode”: “+91”,
“cntNo”: 9566262694,
“pwd”: “123456”,
“device”: {
“mode”: “ANDROID”,
“deviceId”: “234234”,
“deviceToken”: “234234”,
“model”: “SAMSUN”,
“version”: “2.0”
}
}
API Response:
{
“statusCode”: 200,
“message”: “Success”,
“authorization”: “DeqrkRVMLylPWrUwtlWDkXImN”
}
Model API Schema
If the API response and Model API schema is mismatching then the tester can file the issue.
LOGIN API Test Case:
LOGIN SCREEN REFERENCE:

|
Case ID |
Scenario to Verify |
Expected Result |
Request Payload |
Response |
|
GS_L_API01 |
When the user is not registerd with the app and trying to Login. |
If the user is not registered with the app earlier, then we need to show the alert message like ‘The user does not exist with the system. Kindly Register’. |
{ “firstName”: “Siva Shankar”, “cCode”: “+91”, “cntNo”: 9566262694, “pwd”: “123456”, “device”: { “mode”: “ANDROID”, “deviceId”: “234234”, “deviceToken”: “234234”, “model”: “SAMSUN”, “version”: “2.0” } } |
{ “statusCode”: 442, “message”: “Mobile Number Not Registered” } |
|
GS_L_API02 |
The user is already register with the app and Login with the app and the user enters the valid mobile number and valid password. The user did not update the user profiles after the registration. Make sure that ‘isAdmin, isProfileCompleted’, and other details coming as ‘False |
The user should get the success message |
{ “firstName”: “Siva Shankar”, “cCode”: “+91”, “cntNo”: 9566262694, “pwd”: “123456”, “device”: { “mode”: “ANDROID”, “deviceId”: “234234”, “deviceToken”: “234234”, “model”: “SAMSUN”, “version”: “2.0” } } |
{ “statusCode”: 200, “message”: “Success”, “user”: { “cCode”: “+91”, “cDate”: “2017-03-30T06:40:44.988Z”, “cntNo”: 9566262694, “id”: “PLR00002”, “isAdmin”: false, “isProfileCompleted”: false, “isAccountVerified”: false, “mbNo”: “+919566262694”, “uDate”: “2017-03-30T06:40:44.988Z” }, “authorization”: “gWeLytQBnGjvhJCVTGLsKuMba” } |
|
GS_L_API03 |
The user enters the ‘Valid Mobile Number’ and Incorrect Password. |
The user should get the ‘Failure Message’ like, ‘Kindly check your password’. |
{ “firstName”: “Siva Shankar”, “cCode”: “+91”, “cntNo”: 9566262694, “pwd”: “123456”, “device”: { “mode”: “ANDROID”, “deviceId”: “234234”, “deviceToken”: “234234”, “model”: “SAMSUN”, “version”: “2.0” } } |
{ “statusCode”: 410, “message”: “Invalid Credentials” } |
|
GS_L_API04 |
If the user did not fill any mandatory field like ‘cCode’,’cntNo’,’Mode’, ‘Device iD’, ‘deviceToken’, then the API should throw the alert message |
The user should get the failure message, ‘Theser field are required alert message should be displayed’. |
{ “cntNo”: 9566262694, “pwd”: “1234”, “device”: { “mode”: “ANDROID”, “deviceId”: “234234”, “deviceToken”: “234234”, “model”: “SAMSUN”, “version”: “2.0” } } |
{ “statusCode”: 400, “error”: “Bad Request”, “message”: “child \”cCode\” fails because [\”cCode\” is required]”, “validation”: { “source”: “payload”, “keys”: [ “cCode” ] } } |
|
GS_L_API05 |
The user did not fill the optional filed and trying to register with App. Make sure that the API is not throwing any alert. |
The user should able to Login If the optional filed is not get filled |
{ “firstName”: “Siva Shankar”, “cCode”: “+91”, “cntNo”: 9566262694, “pwd”: “123456”, “device”: { “mode”: “ANDROID”, “deviceId”: “234234”, “deviceToken”: “234234”, “model”: “SAMSUN”, “version”: “2.0” } } |
{ “statusCode”: 200, “message”: “Success”, “user”: { “cCode”: “+91”, “cDate”: “2017-03-30T06:40:44.988Z”, “cntNo”: 9566262694, “id”: “PLR00002”, “isAdmin”: false, “isProfileCompleted”: false, “isAccountVerified”: false, “mbNo”: “+919566262694”, “uDate”: “2017-03-30T06:40:44.988Z” }, “authorization”: “gWeLytQBnGjvhJCVTGLsKuMba” } |
|
GS_L_API06 |
Check the API response with Response Object. |
API response and Response Object should be match. Make sure that all the mandatory fields are coming. |
{ “firstName”: “Siva Shankar”, “cCode”: “+91”, “cntNo”: 9566262694, “pwd”: “123456”, “device”: { “mode”: “ANDROID”, “deviceId”: “234234”, “deviceToken”: “234234”, “model”: “SAMSUN”, “version”: “2.0” } } |
I will check the Schema with API response once all the other API’s integration is completed. |
|
GS_L_API07 |
The user completed the registration and verify the OTP. The user is updated the user Profile and specifications. |
The user profile updated and OTP verify should come as True. |
{ “firstName”: “Siva Shankar”, “cCode”: “+91”, “cntNo”: 9566262694, “pwd”: “123456”, “device”: { “mode”: “ANDROID”, “deviceId”: “234234”, “deviceToken”: “234234”, “model”: “SAMSUN”, “version”: “2.0” } } |
{ “statusCode”: 200, “message”: “Success”, “user”: { “cCode”: “+91”, “cDate”: “2017-03-30T06:40:44.988Z”, “cntNo”: 9566262694, “id”: “PLR00002”, “isAdmin”: false, “isProfileCompleted”: true, “isAccountVerified”: true, “mbNo”: “+919566262694”, “uDate”: “2017-03-30T06:40:44.988Z” }, “authorization”: “gWeLytQBnGjvhJCVTGLsKuMba” } |
How the developer will come to know, whether do we need to navigate the user to the OTP Page or Profile Page or Home Feed Screen?
They will navigate to pages based on the Login response.
Case : The user is register with the application and not verify the OTP. The response should come like below,
{
“statusCode”: 200,
“message”: “Success”,
“user”: {
“cCode”: “+91”,
“cDate”: “2017-03-30T06:40:44.988Z”,
“cntNo”: 9566262694,
“id”: “PLR00002”,
“isAdmin”: false,
“isProfileCompleted”: false,
“isAccountVerified”: false,
“mbNo”: “+919566262694”,
“uDate”: “2017-03-30T06:40:44.988Z”
},
“authorization”: “gWeLytQBnGjvhJCVTGLsKuMba”
}
Here, isAccountVerified key indicating whether the user verified their account or not.
If it’s coming as false, then the user should navigate the user to the ‘OTP Screen’.
If it’s coming as true, then the next validation whether the user updated their profile or not. If the user did not update their profile, then the user should navigate to the profile page.
API Error Response Codes:
Addition to that 500 – Internal server error should be added.
If the request payload format is incorrect, then the response should be displayed like below.
{
“statusCode”: 400,
“error”: “Bad Request”,
“message”: “Invalid request payload JSON format”
}
API Header, Path, Body details:

Header – Enter the Authtoken.
ID – Enter the Match ID
Body – The request will be formed here.
Try it out or Submit – After entering all the details, we have to click the button to see the server response.
In this case, we can test the scenario like,
What is happening when we enter the valid auth token?
What is happening when we enter the invalid auth token?
What is happening when we enter the valid match ID?
What is happening when we enter the invalid match id?
What is happening when we try to reach the server without fill the Match ID?
What is happening when the request payload is incorrect?
What is happening when the request payload is correct?
Addition to that we have to check enum model schema object. In the above example, we have to test whether the API is accepting [TEAM_DISQUALIFIED, BAD_WEATHER, OTHERS]
We can able to reach the server without entering the mandatory fields? If the fields are mentioned as mandatory, then no need to fill.
Let assume that the below screen is designed for the Application,
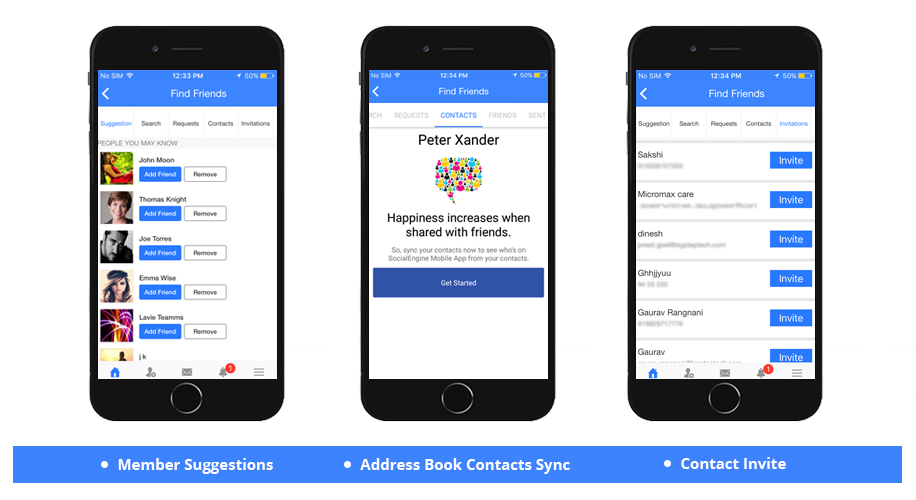
How to write the API test cases for the above screen?
-
Verify the user hi the suggestion API and get the Suggested User list.
Request Payload:
{
“index”: 0,
“limit”: 10,
“sortingKey”:”players.playerName.fName”,
“sortBy”: “asc”
}
Here the top 10 players will be sorted out based on the player name sorting key.
Sample Response:
{
“sortingKey”: “cDate”,
“sortBy”: “desc”,
“lstRecvDt”: “2017-09-13T07:07:27.354Z”,
“players”: [
{
“id”: “PLR02726”,
“cCode”: “+91”,
“cntNo”: 7358496133,
“mbNo”: “+917358496133”,
“cDate”: “2017-08-10T10:12:22.276Z”,
“uDate”: “2017-08-10T10:13:42.762Z”,
“gender”: “MALE”,
“playerName”: {
“lName”: “Steyn”,
“fName”: “Karthik”
},
“DOB”: “1990-11-24T10:13:31.071Z”,
“email”: “karthick@hakunamatata.in”,
“battingStyle”: “RIGHT_HAND”,
“specificationType”: “ALL_ROUNDER”,
“isInvited”: false
},
{
// Here is the list of next users will be displayed
}
}
]
}
2. Verify the user A can send the request to the user B giving their User B id with valid auth token.
Note: In the JSON response, the user will be displayed in the Array list. We will get the User B player ID from the suggested API.

3. Verify the user can send the request to the user by giving their user id with valid auth token.
4. Verify when the user trying to send the request to the user again, ‘Request sent’ message is coming.
5. Verify the user can see the next set of 10 users by changing the starting and ending index.
6. Verify the username is available along with user image. If the user did not upload any image, then the client side developer will display the default placeholder image.
7. Verify the pagination is available to display the top 10 items.
8. Verify the User B got the friend invite notification in their account.

9. Verify the user B can either Accept or Reject the request.

10. Verify the each suggested friend username contain the ID. So that the user can navigate to the particular user page by giving the valid auth token and id.

Here, to view the profile we have to use the GET

You can post your suggestions and queries below, I would be happy to receive your comment.

Informative.
LikeLike